Category Archives: Fruit

Strawberry & Thyme Galette with Honey Ricotta (with bonus competition!)

Strawberry Galette

When I was a kid, I managed to convince myself that I was allergic to strawberries. I’m not entirely why I came to this conclusion – I think it was probably due to me becoming violently ill after greedily eating two punnets of the things at once. Either way, I spent a large portion of my teenage years refusing to touch the things for fear of a repeat performance, adding it to the litany of  food items (including bananas and grated cheese) that I developed bizarre phobias of.

Then I entered adulthood and decided to pull myself together. I’m not entirely sure when I decided I liked strawberries again. I just know that I decided to live dangerously and put a dollop of strawberry jam on my toast one morning and became hooked all over again. I love them in jams, I love them in cakes, and I simply adore them smothered in thick clouds of clotted cream. I love how the sweetness of strawberries plays off against so many other different flavours – the tang of vinegar, the sizzle and pop of pepper, and – as I’ve recently discovered – the punchiness of thyme.

This Strawberry & Thyme Galette is the perfect thing to bake if (like me) you still have a minor phobia of making pies containing soft fruits for fear that they will explode all over your oven, leaving you scrubbing bits of burnt on goo off it for the next six months. The dough comes together in minutes, it’s an absolute cinch to roll out and – joy of joys! – there’s no fiddling about with pie tins. Instead, you merely fold a deliciously scented crust over strawberries which have been macerated in lemon juice and a whole lot of zest. I think that the thyme adds a divine slightly savoury note, but if it’s not your bag, just leave it out. It’s the kind of bake which can stand up to a whole lot of fiddling (I’m already contemplating making a version where the strawberries are macerated in ginger cordial.)

The thing which brings it all together though is the honey ricotta. I’ve become slightly addicted to making my own ricotta at the moment (it’s all part of my five year plan to become the kind of woman who can bench press her own body weight and make her own cheese) and making it will make you feel like a super cool urban milkmaid. Something which I personally feel we need more of.

To celebrate the fact that I managed to make a pie and homemade cheese with no major incident, the nice folks at OXO kitchenwear have provided me with a free strawberry kit to give away to one lucky winner. It contains a strawberry huller, a set of berry bowls for all your Summer baking needs, and two punnets of strawberries from Berry World. They’ll also stick you in a prize draw to win a year’s supply of strawberries. Pretty sweet, huh? To enter, just leave a comment below saying what you’d bake with a punnet of strawberries. You’ve got until 15th July to enter, so good luck!

Strawberry Galette with Thyme Crust (Slice and jar)


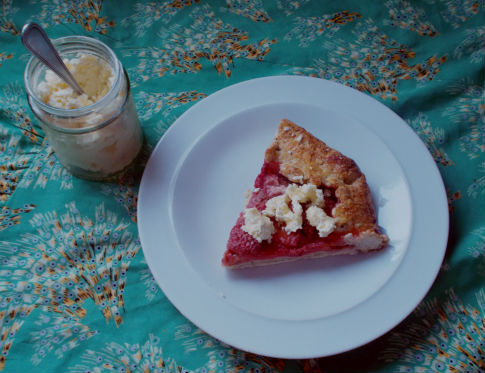
STRAWBERRY & THYME GALETTE WITH HONEY RICOTTA (Serves 6 – 8 people)

Inspired by Food 52

You will need:

For the thyme pastry

  • 300g plain flour (plus extra for rolling)
  • 150g unsalted butter, cut into cubes
  • 1 tbsp dried thyme (add 1/2 tsp more if you are using fresh)
  • 2 tbsps demerara sugar, plus extra for dusting
  • 1 tsp salt
  • 50ml ice-cold water
  • 1 egg, beaten, for glazing the crust

For the strawberry filling

  • 1 punnet of strawberries
  • 35g demerara sugar
  • 1 lemon
  • 1 tbsp plain flour
  • 1 tbsp cornflour

For the honey ricotta

  • 2 pints full fat milk
  • 2 tbsps lemon juice
  • 1 tbsp good quality honey
  • You will also need a jam thermometer and some cheesecloth for straining (although you could probably use a clean tea towel for this at a pinch)

Make It!

  1. Preheat oven to 200° C/Gas Mark 6
  2. Mix together the dry ingredients. Rub the cubed butter in with your fingers until fully combined, and the butter has broken down into pea-sized pieces. (alternatively, if you have a food processor, just blitz the ingredients in this.) SLOWLY add the ice water until the dough JUST begins to come together. Turn the crust mixture out onto some clingfilm, wrap it up and flatten it into a disk. Refrigerate for 10 minutes while you prepare the strawberries.
  3. Hull and slice the strawberries, before combining them with the sugar, flour and cornflour. Add the juice and zest of the lemon and mix well (you’ll see the strawberries beginning to break down slightly, but they will be OK so long as you use them right away.)
  4. Lay a piece of baking paper which is just large enough to cover a baking sheet onto a flat surface. Remove the chilled dough from your fridge and unwrap it on this. Dust with flour, and roll it out until it is the thickness of your index finger. Spoon the strawberry filling into the centre of the crust, and spread it out, taking care to leave a 2-inch border.
  5. Carefully fold the crust border over the filling (don’t worry about making it look pretty, you want this to look a bit haphazard!) Brush the crust with beaten egg, and sprinkle well with the leftover demerara sugar.
  6. CAREFULLY slide the galette, still on the baking paper, onto your baking sheet. Bake for about 40 minutes, or until crust is golden brown. Remove from oven and leave to cool for ten minutes.
  7. While the galette is baking, make your ricotta following this method from The Kitchn. You only need to drain the ricotta for ten minutes, as you want it to be quite soft and fluffy. Once drained, add the honey and leave to one side until the galette is baked.
  8. Once the galette is cool, serve immediately with a large blob of the honey ricotta. Both the ricotta and the galette should keep for around five days.


Tagged , , , , , ,

Rhubarb Crumb Cake

Rhubarb. Rhubarb, Rhubarb, Rhubarb. It’s a great word, isn’t it? The very mention of it starts the Roobarb and Custard theme (arguably the best children’s TV theme tune ever) playing in my head. And, I discovered today that the Icelandic word for ‘rhubarb jam’ is rabarbarsulta. Try saying that when you’re drunk.

I’m a (very) recent convert to rhubarb having only tried it for the first time a mere two months ago. If you’re wondering why it’s taken me 28-and-a-half years to try a vegetable that the rest of the Western world raves about, the only answer I can give to you on that score is that I had a rather deprived childhood. I don’t remember my family actually saying anything about disliking rhubarb, I just know that that it was never in my house when I was a child. Until I discover why this is, I’m just going to blame it on my American mother’s fear of strange English foods, and my English father’s distaste of anything stringy which can be stewed until it turns into a mushy pulp.

I love the colour of rhubarb – the shade of blushing cheeks on a cold December day. Such a beautiful vegetable deserves a better fate than being drowned in powdery Birds custard. Instead, it should poached in vanilla, anointed in ginger, tinted with sugar and cinnamon, and turned into something truly spectacular. Like this Rhubarb Crumb Cake.

Whenever I feel tired or sad, I bake. And this weekend, I felt absolutely exhausted after two solid weeks of running around the country and living off a combination of bourbon, Pro Plus and M&S sandwiches. My soul needed a bit of a pick-me-up, as did the rhubarb which was slowly turning to mulch at the bottom of my fridge. And what better pick me up is there for body, mind, and decomposing fruit than cake?

This cake is a bit of a mish mash of lots of difference influences, spices and methods. First, the rhubarb is caramelised in a mixture of butter, sugar, vanilla and star anise until it begins to candy slightly, and your kitchen smells like the inside of a sweet shop. Then, you layer the rhubarb with a ginger sponge and top it off with a cinnamon crumb. The end result is blissful, harmonious, and worryingly addictive –  like all cakes, it goes well with a nice cup of tea, but secretly I think it would work just as well if you decided to pair it with a shot of the hard stuff (i.e. whisky) too.

So, rhubarb. Like Doctor Who, going to bed before 2am on a schoolnight, and the collected works of Steely Dan, you appear to be yet another thing I’ve come to newly appreciate as I hurtle towards 30. Here’s to the start of a beautiful relationship.

RHUBARB CRUMB CAKE

You will need:

For the cake

  •  50 g butter
  • 250 g brown sugar
  • 350 g rhubarb, trimmed and cut into 2cm chunks
  • 200 g plain flour
  • 1 tsp baking powder
  • 1/4 tsp bicarbonate of soda
  • 1/2 tsp salt
  •  2 eggs
  • 200 ml buttermilk
  • 1 tablespoon ginger jam
  • 1 tsp vanilla extract
  • 3 star anise
  • 75 ml vegetable or sunflower oil

For the crumb

  • 100g plain flour
  • 100g butter
  • 2 tsp cinnamon

Make It!

  1. Preheat the oven to 180C/gas 4.
  2. Melt the butter in a small saucepan. Stir in 125g sugar, the vanilla extract and the star anise and cook on a gentle heat for about 5 minutes, until it begins to turn a golden brown colour.
  3. Add the rhubarb, remove from the heat and set aside.
  4. Sieve the flour, baking powder, bicarbonate of soda and salt into a bowl.
  5. In another small bowl whisk the egg and add the remaining brown sugar, the buttermilk, oil and ginger jam, and mix well.
  6. Combine the dry ingredients with the wet ingredients, until they combine to form a liquid batter.Now, make your cinnamon crumb topping. To do this, just rub the butter, flour, sugar and cinnamon in a bowl untilthe mixture resembles breadcrumbs.
  7. Pour the rhubarb pieces into the cake tin, ensuring that it thoroughly covers the bottom. Then, pour the cake batter over this layer. Finally, sprinkle the cinnamon crumbs on top. Make sure that they’re all evenly distributed across the surface of your cake.
  8. Cook in the oven for around 30-45 minutes, until the cake feels firm in the centre. Cool for 5 minutes in the pan before turning out onto a serving plate.
  9. Serve with a large dollop of whipped cream, or creme fraiche. This cake keeps in an airtight container for around a week.


Tagged , , ,

Blackberry and Spiced Rum Jam

I’ve developed quite the thing for jam of late – a new found fetish which has caused Mr. Cay to look at me oddly and ask me in worried tones about whether I’m going to run away and join the W.I. I place the blame for my new hobby firmly on my attendance of the World Marmalade Awards earlier this year. Who knew that standing around in a muddy field on a cold February day discussing pectin levels could be so stimulating? Since then, I’ve felt compelled to jam every soft fruit I can get my hands on. I even had a heated debate with my best friend in London this weekend about whether you can jam tomatoes or not. I say yes, and as I’m the only jam ‘expert’ I know (OK, granted, I use that term loosely) I think that I win that particular argument.

My working knowledge of maceration is handy considering that I’ve been asked to do a jam making workshop at the Northern Quarter Street Party this coming Friday. Whilst other, less sensible people than I will be standing around waving flags and celebrating the holy matrimony of two chinless wonders, I’ll be showing the fair people of Manchester how to create a kick ass conserve. I will also be wearing a very billowy dress and, hopefully, a hat with a big bow on it. Hell, if that’s not enough reason to see me make a fool out of myself in public, then I don’t know what is.

One of the jams I’m hopefully going to demonstrating is this fine fella, my Blackberry and Spiced Rum jam. Blackberries and spiced rum might sound like a bit of an interesting concoction, but the two tastes actually complement each other surprisingly well. Full of vanilla notes, a snifter of nutmeg and a slight kick of cinnamon, this is the kind of jam that evokes the first tastes of Spring, and celebrates those wonderful fat juicy blackberries you start to find on hedgerows across the countryside at this time of year.  This is the kind of jam which demands to be stirred into porridge, smothered liberally on toast (I’ve found that it goes particularly well with rye bread), or just eaten straight out of the jar in huge heaped spoonfuls.

I’ve found that when cooking this jam, it’s best not to put the alcohol directly into the mixture, as this can cause the pectin to break down and stop your jam from setting. Instead, add a tablespoon of the spirit to the bottom of each jar. Then, when you’ve poured the jam into the sterilised jars, tip them upside down, so that the spirit diffuses through the mixture. What you’ll be left with is a deliciously boozy, fruity treat -and is just the thing to put a Spring in your step when you spread it onto your crumpets in the morning.

BLACKBERRY AND SPICED RUM JAM (Makes approx two jars of jam)

You will need:

  • 500g blackberries
  • 500g granulated sugar
  • 2 tablespoons lemon juice
  • 1 tablespoon spiced rum (I used Morgan’s Spiced)
  • 1 teaspoon vanilla extract
  • 1/2 teaspoon butter (this helps to produce a clearer jam, and prevents it from foaming up too much)

Make It!

  1. Wash your blackberries, and toss them into a wide shallow pan (a stock pot or preserving pan works quite well here). Mash them down with a wooden spoon, add the lemon juice and sugar, and leave them to macerate (i.e. break down and start to turn syrupy) for ten – fifteen minutes. Whilst this is going on, put a small saucer in your fridge – you’ll need it later.
  2. Once the berries have macerated and turned nice and squidgey, add the lemon juice, vanilla extract and butter.  Cook the mixture over a medium heat – it should  start to bubble and froth quite vigorously at this point, Skim the froth off the top of the pan, and be sure to keep stirring the mixture vigorously so it doesn’t stick and burn.
  3. After around twenty five minutes or so, your jam should be starting to set. To test it, place a small amount on the cold plate and leave for thirty seconds. If it crinkles, then it’s done. If the mixture is looking too thin, cook it for another few minutes to obtain a thicker consistency.
  4. Once your jam is done, add a tablespoon of spiced rum to a hot, sterilsed jam jar. (To sterilise the jars, bake them on the lowest setting of your oven for fifteen minutes or so). Ladle the hot jam into each jar, wipe the excess from around the sides. Cover the top surface of the jam in each jar with waxed paper discs that have been cut to size – they should cover the entire surface of the jam (you can buy these from somewhere like Lakeland). Press the wax disc down to create a tight seal. Screw the top onto each jar, and then tip them upside down so that the rum diffuses through the mixture.
  5. Sealed jam should keep for up to a year when stored in a cool and dry place. When you fancy tucking into your bounty, this goes especially well with toast, yoghurt and creamy porridge.
Tagged , ,