WIN! A hamper of foodie goodies from Marks & Spencer

M&S competition hamper

Well, it’s officially Autumn. I realised when I decided to have an al fresco lunch on my offices’s roof terrace last week, only to spend my time shivering in my shirt sleeves. I’ve started looking longingly at 120 denier tights and gigantic fisherman’s jumpers. I’ve even started to contemplate putting the central heating on. Bye bye Summer. We had a good run.

But hey, if you’re going to sit around feeling miserable because you can no longer go drinking in a beer garden without getting rained on, you may as well do it in style. Which is why I’m offering Little Red Courgette readers (pssst…that’s you) the chance to win M&S Food and Drink hamper. This little number contains everything you need to make a night in chaining episodes of ‘Scandal’ on Netflix that little bit better, and contains:
  • Classic claret Bordeaux
  • English mint dark chocolate buttons
  • Metropolitan biscuits
  • British raspberry soft set jam
  • Oat, cheddar & nigella seed biscuits
  • Slow baked oatmeal shortbread
  • Slow baked walnut shortbread
  • Luxury gold teabags
The hamper has been donated by those nice people at Marks & Spencer Simply Food Prescot based in Merseyside, which opened on Wednesday 1st October. The 8,500sq ft store will create 57 new jobs for the area and will provide customers with more than 4,500 quality M&S food and drink lines along with a selection of flowers, cards, and gift wrap. Customers can also look forward to a new in-store Bakery and 50-seat Café.
To be in with a chance of winning, simply answer the following question in the comment box on this post:
How many seats will the M&S Café at the new store have?
a) 40
b) 50
c) 60
You’ve got until noon on Friday 10th October to enter, so hop to it! (And good luck!)
THE LEGAL BIT
1. One winner will be selected at random after the closing date of Friday 10th October.
2. The winner will receive an M&S Food and Drink hamper.
3. Prize not transferable, no whole/part cash alternatives, delivered within 28 days of competition closing date.
4. No photocopies are allowed.
Tagged , , , ,

Chicken, Bacon and Cannellini Bean Stew

Chicken Bacon and Cannellini Bean stew

I returned home from holiday last Thursday with a lot of good intentions. I would swim every day! Eat more vegetables! Buy more warm clothes! Stop worrying about work! Finally get around to uninstalling Kim Kardashian: Hollywood from my phone! (Seriously, that thing is a bloody time sink), blog more! While I’ve not exactly kicked these bold statements of intent to the kerb, I’ve certainly nudged a fair few of them out of sight. But my promise to myself to blog more keeps pinging back up like a stray piece of fringe and hitting me in the face. Which means I should probably try to do something about it.

While I’ve not exactly fallen out of love with food blogging, I’d be lying if I said that my relationship with it hasn’t cooled out slightly. I think back to the halcyon days of 2012 where I was writing here every week and dearly wish I could get that spark back. It’s not so much that I haven’t been inspired, more that I haven’t been arsed to put aside the minutes and hours required to take pictures of my dinner and write stories about it. Perhaps blogging and I need to go on a dirty weekend somewhere and rediscover each other. 

As it is, I’m back for now, and I’m going to do my damnedest to keep the spark alive. So, here’s a stew I threw together on a Monday evening in late Summer when I should have been doing something more worthwhile such as going out for a run, swimming 50 lengths or reading improving literature. Combining chicken thighs (a vastly underrated cut of meat), bacon and a whole heap of vegetables I found moldering away at the bottom of my fridge, this is a stew which comes together in an hour, makes enough to feed a small army and freezes beautifully. I used carrots and green beans as those were the ones I had to hand, but I know that this also works well with various root vegetables (such as turnips or butternut squash.) The cannellini beans add a nice bit of starch and help to thicken the sauce which is so delicious  you could happily lap it up with a spoon. 

I’m not sure if this is a stew fit to cure my blogger’s block. But I suppose it’s as good a place to start as any other.

CHICKEN, BACON AND CANNELLINI BEAN STEW (Serves Four)

You will need:

  • 4 chicken thighs (preferably with the skin still attached, as I think that the fat rendered from the skin gives the dish a real hit of flavour)
  • 4 rashers of good quality bacon, chopped into chunks
  • 1 medium sized onion, sliced
  • 1 tbsp plain flour
  • 1 medium sized glass of white wine (roughly 200ml)
  • 400ml chicken stock
  • 1/2 tsp dried thyme
  • 1/2 tsp dried rosemary
  • 1/2 tsp dried tarragon
  • 2 – 3 carrots, peeled and thickly sliced
  • 1 tin of cannellini beans, drained
  • 1 large handful of green beans, topped, tailed and sliced in half
  • Salt and Pepper to taste

Make It!

  • Preheat your oven to 180°C/Gas Mark 4. Season the chicken thighs well with salt and pepper. 
  • Heat up a good glug of olive oil in a flameproof casserole dish. Place the chicken thighs skin side down, and fry until golden. Transfer to a plate and remove the skin if you wish. Add the bacon to the pot and fry until it is beginning to turn crisp. Add the sliced onion, and continue to cook for five minutes until the onions turn soft.
  • Stir in the flour, and cook out until the flour is fully incorporated into the fat. Add the wine, the stock and the herbs and bring to a simmer. Season with salt and pepper if required. Return the chicken thighs to the pot, along with the sliced chunks of carrot. Cover, and place in the oven.
  • Pour yourself a glass of wine. Drink it. This should take you roughly half an hour or so, by which point it’s time to check your casserole. Add the drained cannellini beans and sliced green beans. Cover, and place back in the oven for another half an hour. Pour yourself another glass of wine. (Try not to kill time by calling your parents and getting distracted while your Dad tells you about his new Disabled Person’s railcard.)
  • The casserole is done when the chicken thighs are cooked through. The green beans and cannellini beans should still be firm to the bite. Remove from the oven and serve immediately. 

Strawberry & Thyme Galette with Honey Ricotta (with bonus competition!)

Strawberry Galette

When I was a kid, I managed to convince myself that I was allergic to strawberries. I’m not entirely why I came to this conclusion – I think it was probably due to me becoming violently ill after greedily eating two punnets of the things at once. Either way, I spent a large portion of my teenage years refusing to touch the things for fear of a repeat performance, adding it to the litany of  food items (including bananas and grated cheese) that I developed bizarre phobias of.

Then I entered adulthood and decided to pull myself together. I’m not entirely sure when I decided I liked strawberries again. I just know that I decided to live dangerously and put a dollop of strawberry jam on my toast one morning and became hooked all over again. I love them in jams, I love them in cakes, and I simply adore them smothered in thick clouds of clotted cream. I love how the sweetness of strawberries plays off against so many other different flavours – the tang of vinegar, the sizzle and pop of pepper, and – as I’ve recently discovered – the punchiness of thyme.

This Strawberry & Thyme Galette is the perfect thing to bake if (like me) you still have a minor phobia of making pies containing soft fruits for fear that they will explode all over your oven, leaving you scrubbing bits of burnt on goo off it for the next six months. The dough comes together in minutes, it’s an absolute cinch to roll out and – joy of joys! – there’s no fiddling about with pie tins. Instead, you merely fold a deliciously scented crust over strawberries which have been macerated in lemon juice and a whole lot of zest. I think that the thyme adds a divine slightly savoury note, but if it’s not your bag, just leave it out. It’s the kind of bake which can stand up to a whole lot of fiddling (I’m already contemplating making a version where the strawberries are macerated in ginger cordial.)

The thing which brings it all together though is the honey ricotta. I’ve become slightly addicted to making my own ricotta at the moment (it’s all part of my five year plan to become the kind of woman who can bench press her own body weight and make her own cheese) and making it will make you feel like a super cool urban milkmaid. Something which I personally feel we need more of.

To celebrate the fact that I managed to make a pie and homemade cheese with no major incident, the nice folks at OXO kitchenwear have provided me with a free strawberry kit to give away to one lucky winner. It contains a strawberry huller, a set of berry bowls for all your Summer baking needs, and two punnets of strawberries from Berry World. They’ll also stick you in a prize draw to win a year’s supply of strawberries. Pretty sweet, huh? To enter, just leave a comment below saying what you’d bake with a punnet of strawberries. You’ve got until 15th July to enter, so good luck!

Strawberry Galette with Thyme Crust (Slice and jar)


STRAWBERRY & THYME GALETTE WITH HONEY RICOTTA (Serves 6 – 8 people)

Inspired by Food 52

You will need:

For the thyme pastry

  • 300g plain flour (plus extra for rolling)
  • 150g unsalted butter, cut into cubes
  • 1 tbsp dried thyme (add 1/2 tsp more if you are using fresh)
  • 2 tbsps demerara sugar, plus extra for dusting
  • 1 tsp salt
  • 50ml ice-cold water
  • 1 egg, beaten, for glazing the crust

For the strawberry filling

  • 1 punnet of strawberries
  • 35g demerara sugar
  • 1 lemon
  • 1 tbsp plain flour
  • 1 tbsp cornflour

For the honey ricotta

  • 2 pints full fat milk
  • 2 tbsps lemon juice
  • 1 tbsp good quality honey
  • You will also need a jam thermometer and some cheesecloth for straining (although you could probably use a clean tea towel for this at a pinch)

Make It!

  1. Preheat oven to 200° C/Gas Mark 6
  2. Mix together the dry ingredients. Rub the cubed butter in with your fingers until fully combined, and the butter has broken down into pea-sized pieces. (alternatively, if you have a food processor, just blitz the ingredients in this.) SLOWLY add the ice water until the dough JUST begins to come together. Turn the crust mixture out onto some clingfilm, wrap it up and flatten it into a disk. Refrigerate for 10 minutes while you prepare the strawberries.
  3. Hull and slice the strawberries, before combining them with the sugar, flour and cornflour. Add the juice and zest of the lemon and mix well (you’ll see the strawberries beginning to break down slightly, but they will be OK so long as you use them right away.)
  4. Lay a piece of baking paper which is just large enough to cover a baking sheet onto a flat surface. Remove the chilled dough from your fridge and unwrap it on this. Dust with flour, and roll it out until it is the thickness of your index finger. Spoon the strawberry filling into the centre of the crust, and spread it out, taking care to leave a 2-inch border.
  5. Carefully fold the crust border over the filling (don’t worry about making it look pretty, you want this to look a bit haphazard!) Brush the crust with beaten egg, and sprinkle well with the leftover demerara sugar.
  6. CAREFULLY slide the galette, still on the baking paper, onto your baking sheet. Bake for about 40 minutes, or until crust is golden brown. Remove from oven and leave to cool for ten minutes.
  7. While the galette is baking, make your ricotta following this method from The Kitchn. You only need to drain the ricotta for ten minutes, as you want it to be quite soft and fluffy. Once drained, add the honey and leave to one side until the galette is baked.
  8. Once the galette is cool, serve immediately with a large blob of the honey ricotta. Both the ricotta and the galette should keep for around five days.


Tagged , , , , , ,

Soup, tea, hot toddies and Grandads – Notes on a cold

Image taken from Smabs Sputzer's Flickr photostrea and used under Creative Commons license

Image taken from Smabs Sputzer’s Flickr photostream and used under Creative Commons license

It started with a tickle.

Just an innocuous little tickle at the back of my throat.  Nothing to be all that worried about. I blamed it on hayfever. Or allergies. Or a minor sniffle due to being a bit run-down. But over the course of the next few days, it grew and grew. I spent most of (the always amazing) Supersonic festival attempting to ignore it by pouring industrial amounts of whiskey, Jamaican ginger beer and jerk chicken laced with a fiery peppery sauce down my throat. But it was to no avail. By the time I called my Dad on Monday evening and spent five minutes convincing him that yes, this woman who did sound like a third rate Deirdre Barlow impersonator was indeed his eldest child, I knew the jig was up. I had a cold.

I hate being ill. As someone who spends most of their life flitting from city to city, the thought of spending days confined in bed doing nothing makes me itchy. I regress to being a child – one who wants someone to tuck them up, make them tea and fetch them Beecham’s Powders. I get lonely. I think about how much fun being ill was when I was a kid. I miss my Grandad.

My Grandad John came to live with us when I was twelve. My Nana June had just died, my Mum wanted to return to the workplace, and it seemed a good fit. He was a man unlike any other I’ve ever met before or since – one who once painted the inside of an oven (My Nana attempted to cook a pie in it, and it blew up, causing her to fly across the kitchen before repeatedly belting him around the head) and whose favourite post-work snack was a block of Stork Margarine dipped in strawberry jam. He resided in our conservatory like a wise old owl who always had a mug of tea in one hand, and a John Player’s Special in the other. During his time in our household, he acted as teacher, study aide, relationships counsellor, human alarm clock, and the World’s Worst Cook. (His ‘signature dish’ was a concoction of chicken breast smothered in Homepride curry sauce, served over half boil-in-the-bag rice, half oven chips. He also once infamously gave my ex-boyfriend food poisoning from some undercooked sausages.) However, where he really came into his own was a Nurse.

Whenever I had the flu, or tonsillitis or any of the other myriad nasty childhood illnesses we carry with us from the playground, he’d make my parents living room our plague battleground. Duvets would be whipped off beds, and the downstairs sofa would be turned into a sumptuous recliner fit for a Empress, full of cushions, pillows and blankets. He’d always make me Cream of Tomato soup with white bread soldiers (always Warburton’s Toastie –  usually a banned substance in my parents household), and – if circumstances were exceedingly dire – a Hot Toddy with perhaps just a smidgen more whisky than was really necessary.  Together we’d watch Watercolour Challenge and Countdown hudded together in that overheated living room like a pair of thieves.

My Grandad has been dead for four years now, but I still try and conjure up the memory of those days spent together whenever I’m ill. Heinz Cream of Tomato soup and tea, hot toddies and Countdown… all these comforting little things which make the past feel as though it’s within touching distance, but at the same time, so incredibly far away.

Tagged , , ,

Five great things from May

Depressing news, depressing weather, depressing social media and (for me) depressing face.  I woke up earlier this week to find my face covered in one of the worst outbreaks of dermatitis that I’ve had in a while which I suspect has been brought on due to changing brands of cleanser. (Damn you expensive cleanser that happens to the best one I’ve ever used. Damn you and your lies.) So, as a means of cheering myself up (and in lieu of the fact that I don’t have an exciting recipe to share with all of you 50-or-so readers yet) I thought I’d write a long list of things I’ve been greatly enjoying recently. Some of this involves food, some of this just involves things that indirectly involve food. But hey, it’s my blog and I’ll freestyle if I want to.

  • BROAD CITY

I was introduced to Broad City by my excellent friend Bethany, and it’s rapidly become one of my favourite TV shows. While on paper, the concept reads as one which has been done to death (the adventures of two 20-something women in New York who spend their time navigating bad jobs, shit sex and awful flatmates), the difference here is that the two main protagonists are funny, realistic and genuinely like each other.  There’s lots of support, no self loathing and – while they can occasionally come across as being awkward and self obsessed – they’re nowhere near as obnoxious, selfish and grandiose as the characters in similar ‘female focused’ sitcoms. I want to hang out and get wasted with Ilana and Abbi, even if the evening would end up with me smooshing cake in my face or accidentally breaking into the wrong flat. Bonus points also go to Ilana’s super-cute boyfriend Lincoln (shown above) who steals every scene he’s in – a point which was proven when I was watching it on the train to work the other day, and the guy watching it over my shoulder chuckled loudly every time he was on screen. Lincoln, be my boo.

  • BACON AND EGG RAMEN FROM FOOD 52

Bacon and Egg Ramen

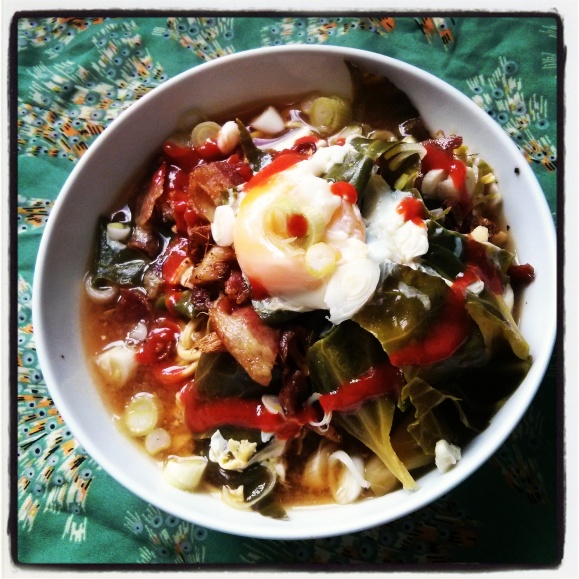
OK, so you can never go wrong with a meal which utilises noodles, crispy bacon and soft poached eggs, but this recipe for Bacon and Egg Ramen from Food 52 is so perfect that it hurts. It requires minimal effort to make, uses ingredients that you probably have lying around your kitchen already and makes a glorious Spring lunch.

  • FELICITY CLOAKE’S ‘PERFECT’ COFFEE AND WALNUT CAKE

Coffee and Walnut Cake


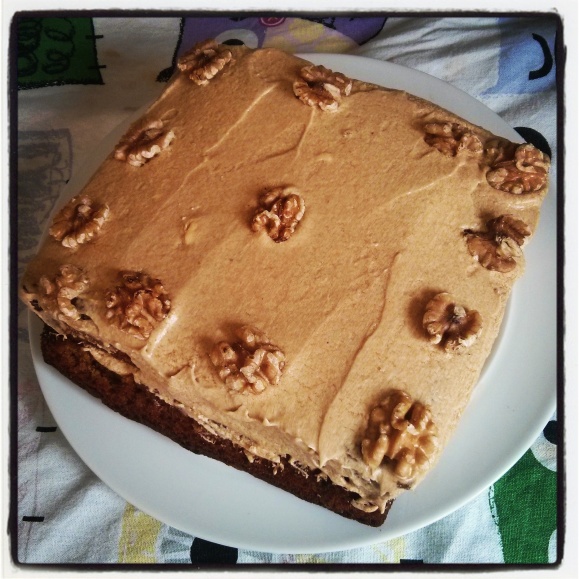
It was World Baking Day last Sunday (I know, I didn’t know it was a thing until this year either. The things you learn when you work for a baking brand!) so I decided to pull out the big guns and make Felicity Cloake’s ‘perfect’ Coffee and Walnut cake. While you can never go wrong with a concoction which involves two layers, a vast amount of buttercream and a truly unholy amount of sugar, not all Coffee and Walnut cake recipes are created equal. Thankfully, I can attest to this one being a humdinger – beautifully moist, deliciously decadent and with just enough coffee to put a bit of pep in your step. Mr. McMc took this into his office last week where it was devoured by his colleagues. And when mine looked at the pictures of it I put on Instagram, I was told off for not making another one to bring into work. It’s that good. (It also makes an excellent breakfast if – like me – you’re fond of eating dessert first thing in the morning.)

  • DOUGHNUT NECKLACE FROM BLACK HEART CREATIVES

Doughnut necklace from Black Heart Creatives

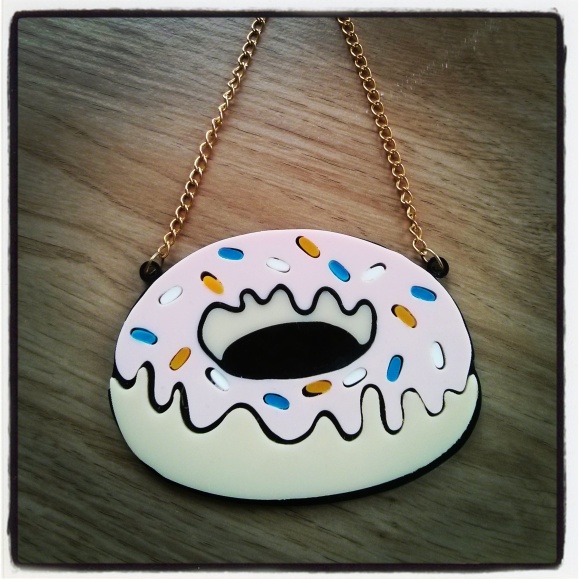
My (incredibly talented) friend Charlotte runs an online jewellery retailer called Black Heart Creatives, and was kind enough to make me this Doughnut Necklace to accompany my Hamburger Queen outfit. Not only does it look good enough to eat, it’s rapidly become my favourite item of jewellery to wear too. (Hey, what fat girl doesn’t love the idea of wearing a massive doughnut around her neck?) Every time I wear it, I get dozens of compliments and a woman even stopped me on the way to the bus stop the other day to comment on how much she loved it.  If you fancy one yourself, I highly recommend checking out the Live Fast Die Yum collection. Honourable mention should also go to their recently launched Palm Bling range too, mostly because I want EVERYTHING IN IT.

  • LITTLE GEORGIA, ISLINGTON

I’ve spent most of the past week holed up in (arguably) London’s tiniest flat in Angel. While navigating tiny beds and even tinier showers isn’t everyone’s idea of fun, the fact that it was situated next to some seriously excellent pubs and restaurants more than made up for it. The highlight of my eating expeditions was undoubtedly Little Georgiaa Georgian themed eatery which featured gigantic glasses of deliciously dry red wine, wonderfully friendly waitresses who sneakily topped up my glass for free when no one was looking, and a gloriously crispy skinned poussin smothered in a messy, buttery walnut sauce just made for licking off your fingers. I would have taken pictures, but to be honest, I was too busy gulping down large slices of Khachapuri (aka ‘the world’s best stuffed crust pizza’) – a beautifully soft floury bread which was stuffed with three types of melted cheese. It’s the kind of food a girl has dirty dreams about. I can’t wait for my next visit.

Pop culture, food and gigantic jewellery – that’s what’s been rocking my world this month. How about you? (And if anyone knows a great facial cleanser for the eczema riddled, send it my way would you?)

Tagged , , , , , , , ,

Chicory, Blue Cheese and Caramelised Onion Tart

Chicory

Because I have pretensions towards being middle class, I get a vegetable box from Abel & Cole delivered each fortnight. And, because I am horrendously forgetful – particularly when it comes to vegetable deliveries – I often neglect to take a look at their website to see what’s going to be in it each week. While this often leads to me opening my box to find delicious surprises inside, it also means that I’m frequently presented with vegetables which I have no idea what to do with (Kohlrabi, anyone?) This is how I found myself frantically googling ‘chicory recipes’ recently. I had a vague memory of eating it in a (frankly disgusting) gratin once –  the sprinkling of anemic looking breadcrumbs doing nothing to disguise its hideous slimy bitterness – so I wasn’t feeling too confident. And I certainly didn’t want to find myself spending an hour of my life slaving over a hot stove only to make something which looked vile, smelt like a foot and ended up being swiftly dispatched to the bin.

Then inspiration kindly decided to roll out of my kitchen cupboards in the form of my tart tin. I’m very fond of baking up leftover vegetables into various creations, and I’m even fonder of finding an excuse to wrap them up in pastry. I had a vague inkling that chicory and blue cheese went well together, one thing led to another, and before I knew it, I was eating gigantic slabs of this Chicory, Blue Cheese and Caramelised Onion Tart for my lunch.

Chicory Blue Cheese and Caramelised Onion Tart

Comprising of caramelised onions and chicory, and a larger-than-really-needed handful of blue cheese,  this is quite a robust little number. It’s helped in no small part by the delicious olive oil tart crust I used as a base. Taken from the delightful French food blog Chocolate & Zucchini, it’s a doddle to make, comes together in minutes and rolls out like a dream (although it can be a bit springy when chilled.)  I found this crust to be perfect for this recipe, although I’m sure that no one will complain if you use ready made shortcrust instead (and if they do, I suggest you throw them some serious side-eye.) This makes a fine lunch, a divine dinner and a seriously superb snack.  It goes very well with a crisp green salad and an even crisper glass of white wine. Alternatively, it also works well being eaten in the light of your fridge while listening to the World at One.

A slice of chicory tart

CHICORY, BLUE CHEESE AND CARAMELISED ONION TART

You will need:

  • One tart crust (either make your own, or use your preferred brand of shortcrust pastry)
  • 2 bulbs of chicory
  • 1 large red onion
  • 30g butter
  • 1tbsp light brown sugar
  • 4 large eggs
  • 50ml creme fraiche
  • 100g blue cheese (I used Cashel Blue), crumbled into lumps
  • Salt & Pepper

Make It!

  1. First, prepare your tart crust. Roll the pastry out to 3mm thickness, and gently lay it over a tart tin. Blind bake it for 15-20  minutes at 200°C/Gas Mark 6. Remove from the oven and leave to cool while you’re preparing the filling.
  2. Slice the onion and the chicory into rounds (making sure to discard the hard core of the chicory.) Heat the sugar and butter together until they are browned and bubbling slightly. Fry the onion and chicory for roughly 5 – 7 minutes until they are soft and golden. Remove from the pan, and set to one side.
  3. Beat the eggs and creme fraiche together, add the lumps of blue cheese and season well with salt and pepper. Layer the chicory and onions inside your baked tart case, and pour the wet mixture over the top, ensuring that the blue cheese crumbs are spread evenly.
  4. Bake at 200°C/Gas Mark 6 for 30 – 35 minutes until set. Leave to cool for fifteen minutes before serving.  This should be good for around a week, meaning it’s great if you want to cook it the day before taking it to a picnic or brunch. 


Tagged , , , , , ,

Cornershop Chocolate Honeycomb Cake

Chocolate Honeycomb Cake (2)

You’d think that with nearly five years of living in Bootle under my belt, I’d have learnt by now. But every Easter it’s the same. The urge to bake something sweet will usually strike me somewhere between my first bacon sandwich and the 3.00pm football kick off, and I’ll realise with a sinking feeling that I’ve not got nearly enough ingredients in my cupboards and all the local supermarkets are closed. Praise be then to the heathen cornershop at the end of my road. OK, so the women behind the counter usually scowl at me for slouching in there in my leggings with unwashed hair, and the produce there verges somewhere between ‘ropey’ and ‘inedible,’ but they’re usually stocked with butter, milk and bread, and you can buy two gigantic bars of Dairy Milk for a quid.

Hence this ‘Cornershop Chocolate Honeycomb Cake,’ a total bastardisation of Nigella Lawson’s classic Honey Chocolate Cake. Made out of various odds and ends, and a jar of delicious citrus infused honey that I managed to sneak home from Florida in my suitcase (Take that Richard Dawkins!) this is a seriously impressive little number. In the wrong hands, the combination of chocolate and honey could be decidedly sticky, but here, the combination of ingredients is perfectly balanced. I also loved the unique chocolate honey ganache which threatens to overwhelm the cake with sticky goop, but hardens into a gloriously shiny glaze.  The original version calls for you to make tiny bees out of marzipan, but I seriously lack both the patience and sugarwork skills to pull that kind of decoration trickery off. Instead,  I just bashed a Crunchie bar to bits with a rolling pin and sprinkled it over the top.

The end result is tasty, tangy and decidedly moreish – you need a lot of willpower to stop at just one slice.  It’s a testament to how good Nigella’s original recipe is that I made this with crappy chocolate and it still managed to be one of the best cakes I’ve baked in a very long time. With good quality ingredients, it’s sure to be sensational.

CHOCOLATE HONEY CAKE (Makes roughly 9 – 10 pieces)

Adapted from Nigella Lawson

You will need

For the cake:

  • 100 g chopped milk chocolate (My preferred brand is Green & Blacks)
  • 275 g light brown muscovado sugar
  • 225 g soft butter
  • 125 ml runny honey
  • 3 medium eggs
  • 200 g plain flour
  • 1 tsp bicarbonate of soda
  • 1 tbsp cocoa powder (again, I prefer to use Green & Blacks, but any good quality cocoa will work well here)
  • 250 ml boiling water

For the icing:

  • 60 ml water
  • 125 ml runny honey
  • 175 g milk chocolate
  • 75 g icing sugar
  • 1 Crunchie bar

Make It!

  1. Take whatever you need out of the fridge so that all the ingredients can come to room temperature. While that’s happening, melt the chocolate from the cake part of the ingredients list in a good-sized bowl. You can either do this by zapping it in the microwave for a minute,  or by suspending the bowl over a pan of simmering water. Set aside to cool slightly.
  2. Preheat the oven to gas mark 4/180°C/350ºF, and butter and line a 23cm / 9 inch springform cake tin. (Alternatively, I used a silicon baking tray I got from my local ASDA, and the cake turned out perfectly.)
  3. Beat together the sugar and soft butter until airy and creamy, and then add the honey. Add one of the eggs, beating it in with a tablespoon of the flour, and then the other egg with another tablespoon of flour. Fold in the melted chocolate, and then the rest of the flour and the bicarbonate of soda. Add the cocoa and last of all, beat in the boiling water. Mix everything well to make a smooth batter and pour into the prepared tin. Cook for up to an hour and a half, though check the cake after 45 minutes and if it is catching cover the top lightly with foil and check every 15 minutes. (As a guide, mine was ready after an hour.)
  4. Let the cake cool completely for 45 minutes – 1 hour. While it’s chilling on the side, bash your Crunchie bar into small pieces. I find it’s quite cathartic to wrap it in a tea towel and beat the living daylights out of it with a rolling pin/EMPTY wine bottle.
  5. To make the glaze, bring the water and the rest of the honey to a boil in a small saucepan, then turn off the heat and add the finely chopped chocolate, swirling it around to melt in the hot liquid. Leave it for a few minutes then whisk together. Sieve in the icing sugar (don’t skip this step, otherwise your icing will be horribly lumpy) and whisk again until smooth.
  6. Pour the icing over the chocolate cake and smooth it down the sides with a palette knife. Sprinkle the bits of crunchie bar over the top and leave to set for an hour – 2 hours prior to serving. This cake should last for seven days in an airtight container, but you’ll be lucky if it lasts for five minutes.
Tagged , , , , ,

Chocolate Dipped Gingerbread Marshmallows


Gingerbread Marshmallows

I love marshmallows. Making them feels like alchemy – taking all these everyday ingredients, boiling them in a gigantic pot and whipping them up into fluffy little candied clouds. However, like many things in life, the road to marshmallow perfection has been paved in gloopy disaster (including one trip to the local supermarket last week where I bumped into my next door neighbour, and she politely pointed out that I had gigantic dollops of congealed marshmallow in my hair and on the tip of my nose.)

After much, much trial and error, I have come to realise that you need three key things if you want to be a record breaker attain marshmallow perfection. These are:

  1. Egg whites: While I am sure that there are some fantastic marshmallow recipes out there that do not require egg whites, I’ve yet to find them. And every time I’ve attempted to make marshmallows without them, it’s left my kitchen looking as though it’s been attacked by the Stay Puft Marshmallow Man. As it is, they add a nice wobble to your finished product, and an even nicer level of structural integrity.
  2. Cornstarch and icing sugar: I nabbed this trick from the baking genius which is David Lebovitz. Dusting a silicon mould in a mixture of cornstarch and icing sugar helps to stop the mixture sticking too much, and makes it easier to cut once set. Rolling the finished squares in this also helps, as it helps to dry them out and make them easier to work with.
  3. Patience: Making marshmallows requires time, patience and a hell of a lot of swear words. They’re not exactly the kind of thing you can whip up at 8pm on a Wednesday evening to take into work the next day. Give yourself a good day or so to make these, and you will be richly rewarded.

Chocolate Gingerbread Marshmallows

As it is, my own spin on marshmallow perfection is a combination of methodology from the aforementioned David Lebovitz, Eat Like a Girl and Delicious magazine, and flavouring inspiration from Joy the Baker . I made this particular batch to support my entry in Hamburger Queen, a fantastic talent show for fat people (like myself) which also saw me donning a blonde wig and a blow-up sax and rolling around on a stage to Bryan Ferry’s Jealous Guy. While (sadly) I didn’t win (the winner made a truly amazing red velvet cake in the shape of Divine, and if that hadn’t won, I would have demanded a judge’s recusal) , these were consumed by both judges and audience members with almost indecent haste. Which, quite frankly, is reward enough for me.

Chocolate Gingerbread Marshmallows

CHOCOLATE DIPPED GINGERBREAD MARSHMALLOWS (Makes 35 – 40 medium sized marshmallows)

You will need:

  • 4 egg whites
  • 120 ml cold water
  • 3 sachets (27 g) powdered gelatine
  • 440 g caster sugar
  • 160 ml golden syrup
  • 1 tbsp ginger cordial
  • 1 tsp vanilla essence
  • 1/2 tsp cinnamon
  • 1/2 tsp allspice
  • 1/2 tsp freshly grated nutmeg
  • 2 tbsp cornflour
  • 2 tbsp icing sugar

For the dip

  • 100 g good quality dark chocolate
  • 7 – 8 gingernut biscuits

Make It!

  1. Dissolve the gelatine in the water and set to one side.
  2. Combine the caster sugar and golden syrup in a pan with 80ml water. Wipe down the sides of a pan with a wet pastry brush, so that the mixture doesn’t crystallise when you’re heating it. Cook over a medium heat until the sugar has dissolved. Then turn up the heat until the mixture begins to boil. Monitor the temperature with a candy thermometer until it reaches 130°C. (Try not to take your eye off the pan, as it will get hot very quickly. If the mixture goes over 130°C, then it won’t set properly.) Take the pan off the heat and leave for a minute.
  3. While the sugar mixture is cooking, whip your egg whites (you’ll need a heavy duty mixer for this I’m afraid) with a pinch of salt until they become light and fluffy. Increase the speed of the mixer to high, before slowly and carefully pouring the hot sugar mixture into the bowl. (Try not to let it stick to the whisk or the sides of the mixer, as it’s a bugger to clean off afterwards.) Add the gelatine and flavourings, and continue to whip until the mixture is completely cool, and is forming stretchy bubblegum-like strands.
  4. Combine the cornflour and icing sugar in a bowl, and use it to dust a silicon baking tray until there are absolutely no bare spots. Pour the marshmallow mixture into the tray and leave it to set for 4 – 6 hours (preferably overnight if you have the time.)
  5. Once the marshmallows have set, dust a piece of baking paper with the leftover cornflour and icing sugar mixture, and remove from the baking tray. Slice them into squares with a lightly oiled palette knife, before rolling them in the mixture.
  6. Chop the dark chocolate into squares, and melt it in a bowl over a pot of boiling water. Crush the gingernut biscuits either by wrapping them in a teatowel and bashing the living daylights out of them with a rolling pin, or by mashing them up in a pestle and mortar. Dip each of the marshmallows in the melted chocolate before sprinkling them liberally with the gingernut crumbs. Allow to set.
  7. These should keep for around a week, but quite frankly, it will be a miracle if they last that long.
Tagged , , , , , ,

The winner is…. (and a recipe for Lemon Curd & Ginger Loaf Cake)

Random org winner

So remember last week where I decided to hold my FIRST EVER BLOG GIVEAWAY to win a fantastic pancake hamper from Abra-ca-Debora? Well, via the application of rigorous internet science* (*entering a load of numbers into random.org), I’m pleased to say that the winner is….Victoria!

Winner's comment
So, massive congratulations to Victoria! I’ll be sending you an email today to get all your details so that a hamper wings its way out to you ASAP.

Outside of competitions and pancakes, it’s been a week frayed at the edges with minor annoyances. For example, did you know that if you experience a moment of madness while running a competition on your blog where you decide to change its WordPress URL, it can – and will – screw everything up? Well, neither did I before last week! You would have thought that – as someone who has a job where she works with the internet all day – I would know this. But no. Cue lots of swearing, and more than one trip to the fridge to bury my face in the jar of lemon curd I had in there.

Lemon curd

I love lemon curd. In fact I can’t really control myself around it. I love how it tastes like a burst of spring sunshine bursting inside your mouth, and how the really good stuff has the texture of velvet. On more than one occasion I have been found hunkering next to the light of an open fridge door, spooning great tablespoons of the stuff into my mouth in lieu of dinner.  But with a two week holiday on the horizon, and the knowledge that I really needed to use up a load of perishable ingredients before I left, I decided to do the honorable thing and stick the leftover half a jar of it that I had into a loaf cake. 

Lemon Curd & Ginger Loaf Cake


Lemon Curd & Ginger Cake with Jam

This was my breakfast this morning

This isn’t the prettiest cake in the world (my notoriously temperamental oven decided to do a number on it and cook the outside to an alarmingly dark shade of brown), and when I pulled it out of the oven, I was slightly alarmed that it looked more like a well fired brick than a delicious tea time treat. However,  when I cut into it, I discovered a sponge which is as pale and bright as a Spring morning. The yoghurt keeps it tender and moist, and the ginger glaze adds an extra shot of zing. While it may not be gracing the pages of any twee food websites any time soon, it is the perfect cake for the season – a little scraggy, not as pretty as it could be, but with lots of beauty right underneath the surface.

LEMON CURD & GINGER LOAF CAKE 

Adapted from BBC Good Food

You will need:

  • 175g softened butter or baking margarine
  • 150ml natural yogurt
  • 3 (large) tbsp lemon curd
  • 3 medium eggs
  • 2 tbsp ginger cordial
  • zest and juice 1 lemon
  • 200g self-raising flour
  • 175g golden caster sugar

For the glaze

  • 100g icing sugar
  • 3 tbsp ginger cordial

Make It!

  1. Heat oven to 160C/gas 3. Grease a medium sized loaf tin and line with baking paper.
  2. Cream the softened butter and caster sugar together in a large mixing bowl until light and fluffy.
  3. Scrape down the sides of the mixing bowl with a wooden spoon before adding yogurt, lemon curd, eggs, lemon zest and 1tbsp flour. Mix until combined. Then, gently fold in the rest of the flour and mix until the batter just comes together. Bake for 55 minutes – 1 hour until a toothpick inserted into the middle comes out clean.
  4. Cool in the tin, before making the glaze. Combine the ginger cordial with the icing sugar (and some of the lemon zest if you have any left over), and mix together until a thin glaze is formed.  Brush over the top of the cake with a pastry brush, ensuring that you get the glaze into every tiny crevice.  Serve in slices with extra lemon curd (or strawberry jam if you’ve eaten all the leftover lemon curd while waiting for your cake to bake), leftover yogurt and a nice cup of tea.
Tagged , , , ,

WIN! A pancake hamper from Abra-ca-Debora

Happy Pancake Day

As you can probably guess, I am a huge fan of Pancake Day (so much so, that a few years ago I set out on a one woman mission to find the best pancakes in Liverpool.) So, when the lovely people at Abra-ca-debora decided to deliver a gigantic hamper filled with everything I needed to make my Pancake Day extra special, I was thrilled. Particularly when I realised that all I had to do to prepare them was microwave them for 30 seconds before smothering them in a sweet topping of my choice. For while I may enjoy being creative in the kitchen, I am also very very lazy.

Abracadebora pancakes

My prep skills of Abra-ca-Debora’s pancakes haven’t yet stretched as far as making one of the delicious recipes on their website (their Chocolate and Salted Caramel Stacked Pudding looks incredible). However, I can tell you that their ‘Diddy Dutch Pancakes’ taste heavenly when microwaved for 30 seconds and smothered in golden syrup. Particularly if you’re eating them for breakfast while suffering from a lethal red wine hangover and attempting to write up a gig review.

Abracadeborah hamper

To celebrate Pancake Day (and the gloriousness of pancakes in general), Abra-ca-Debora have been kind enough to provide me with a pancake hamper to give away to one lucky person. Each one is packed with everything you need to satiate your pancake cravings any day of the week, including two packs of Abra-ca-Debora sweet pancakes, two packs of Abra-ca-Deborah Diddy Dutch Pancakes, a bar of Green & Blacks Sea Salt Milk Chocolate, a jar of Green & Blacks Lemon Chocolate and a jar of English Provender Company Lemon Curd (which is so good, you can just dive into a jar face first.) While it won’t reach you in time for Pancake Day, it’s just the thing for a lazy weekend breakfast, or post Sunday-lunch treat. After all, pancakes aren’t just for Pancake Day!

To win, just leave a comment on this post telling me your favourite type of pancake. Perhaps you’re a fan of Japanese Okonomiyaki? Maybe Vietnamese banh xeo float your boat? Or do you just like to keep it simple with a sprinkle of lemon juice and sugar? Whatever it is, you’ve got until Friday 7th March to enter. Good luck!

Tagged , , ,